
Buying Guides
Best Isopods for Beginners: Easy Species & Setup Guide

Nov
Which Is The Best Isopods For Beginners
Short answer: the best isopods for beginners are hardy, fast-breeding species that forgive the usual first-timer mistakes: Dairy Cow isopods (Porcellio laevis), Dalmatian isopods (Porcellio scaber), Giant Canyon isopods (Porcellio dilatatus) and powder isopods (Porcellionides pruinosus). If you prefer pill bugs that roll into a ball, Magic Potion (Armadillidium vulgare) and Zebra (Armadillidium maculatum) are good next picks. Collector species such as Cubaris, Ardentiella and Montenegro are wonderful, but they are better once you have kept a colony alive for a few months.
This guide explains how to choose, what each beginner species is like to live with, how to set up your first colony step by step, and which mistakes to avoid. It is written for anyone starting out, whether you want a clean-up crew for a bioactive reptile or frog enclosure, a colony to breed, or simply a pet you can watch. Last updated: November 2026.
Table of Contents
What makes an isopod beginner-friendly?
Isopods are not all equally easy. Some tolerate a wide range of humidity and temperature, breed quickly and shrug off a missed feeding. Others need a narrow set of conditions and punish small mistakes. When we call a species “beginner-friendly”, we mean it ticks most of these boxes.
1. It tolerates mistakes
Every new keeper makes a few errors, usually keeping things too wet, too dry or too cold. A good beginner species survives those errors long enough for you to notice and correct them. Hardy Porcellio and powder isopods are famous for this.
2. It breeds reliably
A colony that breeds steadily rewards you quickly and gives you a safety margin. If a few animals die, the population keeps growing. Fast breeders also make better clean-up crews, because a larger group processes more waste.
3. It copes with normal room conditions
The easiest species do well at ordinary household temperatures and do not need special heating. That keeps your setup simple and your costs low.
4. It is active and visible
If you are keeping isopods for enjoyment, you want to see them. Some species hide all day. Beginner favorites tend to wander, climb and feed in the open, especially in dim light.
5. It is easy to find and affordable
Common species cost less, so a mistake does not cost much. You can buy a group of ten for the price of a lunch and learn on them.
6. It suits your goal
The “best” isopod depends on what you want. A species that thrives in a humid frog enclosure may struggle in a dry leopard gecko setup. We cover this in the choosing by goal section.
Quick comparison table
This table summarizes how the main beginner species compare. Temperatures are general guidance, so always check the care notes on the product page for the animals you buy.
| Isopod | Scientific name | Difficulty | Typical comfort range | Moisture | Rolls into a ball? |
|---|---|---|---|---|---|
| Dairy Cow | Porcellio laevis | Easy | About 68 to 78°F (20 to 26°C) | Moderate gradient | No |
| Dalmatian | Porcellio scaber | Easy | About 65 to 78°F (18 to 26°C) | Moderate gradient | No |
| Giant Canyon | Porcellio dilatatus | Easy | About 68 to 78°F (20 to 26°C) | Moderate gradient | No |
| Powder isopods | Porcellionides pruinosus | Easy | About 72 to 82°F (22 to 28°C) | Warm and humid | No |
| Magic Potion | Armadillidium vulgare | Easy to moderate | About 65 to 78°F (18 to 26°C) | Leans drier | Yes |
| Zebra | Armadillidium maculatum | Moderate | About 65 to 78°F (18 to 26°C) | Leans drier | Yes |
| Little Sea | Cubaris murina | Moderate | About 75 to 82°F (24 to 28°C) | Warm, ventilated | Yes |
The best isopods for beginners
1. Dairy Cow isopods (Porcellio laevis)
If we could only recommend one species to a first-time keeper, it would probably be the Dairy Cow. The black-and-white patches really do look like a dairy cow, they breed readily, and they are hardy enough to forgive a lot. You can browse our Dairy Cow isopods and start with a group of ten.

Why they suit beginners:
- They are tough and adaptable across a wide range of household conditions.
- They breed steadily, so a small group can grow into a thriving colony.
- They are active and easy to spot, which makes them satisfying to watch.
- They are inexpensive and widely available.
What to know: Dairy Cows are quick and can be a little skittish when you lift a lid, so keep the container lid secure and work slowly. They cannot roll into a ball like pill bugs. They need a moisture gradient, hides and a calcium source like any other isopod. Their speed and size make them a popular clean-up crew in medium-sized enclosures, and a popular feeder for reptiles and amphibians.
Best for: first colonies, bioactive clean-up crews, feeder cultures and keepers who want a classic, striking beginner species.
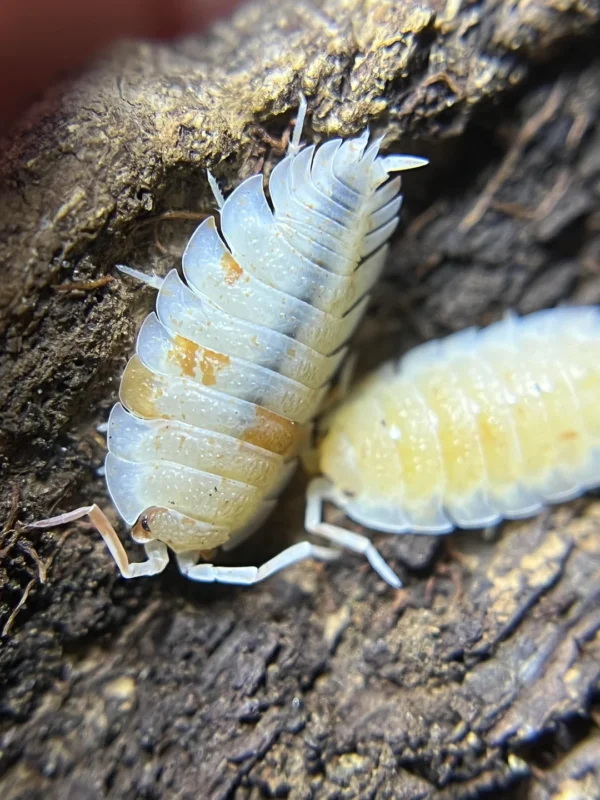
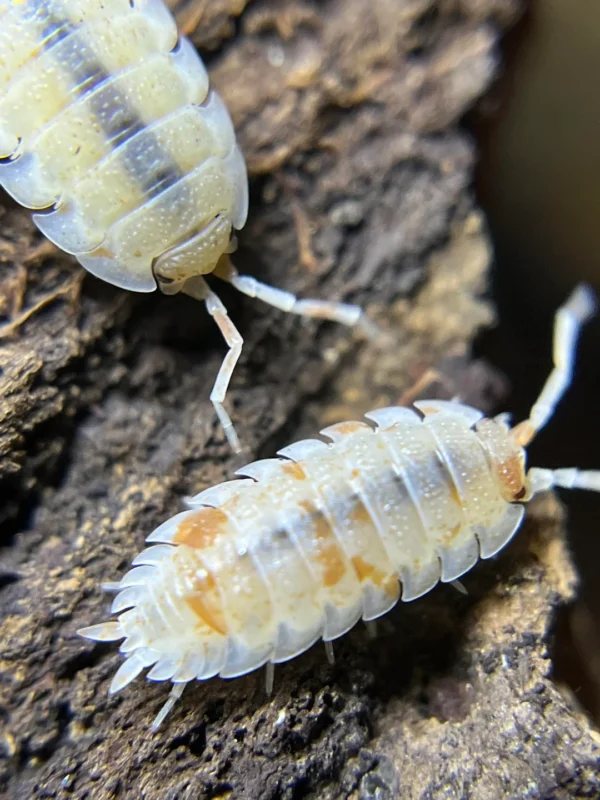
2. Dalmatian isopods (Porcellio scaber)
Dalmatians are the spotted version of one of the most widely kept isopods in the world. Porcellio scaber has a reputation for toughness, and the Dalmatian pattern adds pale spots to a dark body. The same species also comes in several morphs, including Orange, Orange Dalmatian, Calico, Lava and Whiteout, so you can add variety without learning new care rules. Take a look at our Porcellio isopods to see what is in stock.


Why they suit beginners:
- They are among the hardiest isopods available.
- They accept a wide range of temperatures and humidity.
- They are good climbers, so you will often see them exploring bark and decor.
- They breed well and are easy to feed.
What to know: because they climb, a secure lid matters. Different morphs of the same species can interbreed, so keep each morph in its own container if you want to keep pure lines.
Best for: beginners who want a forgiving species with visible patterns, and keepers who like collecting morphs of a single species.
3. Giant Canyon isopods (Porcellio dilatatus)
Giant Canyons are one of the larger isopods you will meet as a beginner. They are active, strong and fast at processing waste, which makes them an impressive clean-up crew. We offer the standard form and the warm-toned Rust morph on our Porcellio dilatatus page.

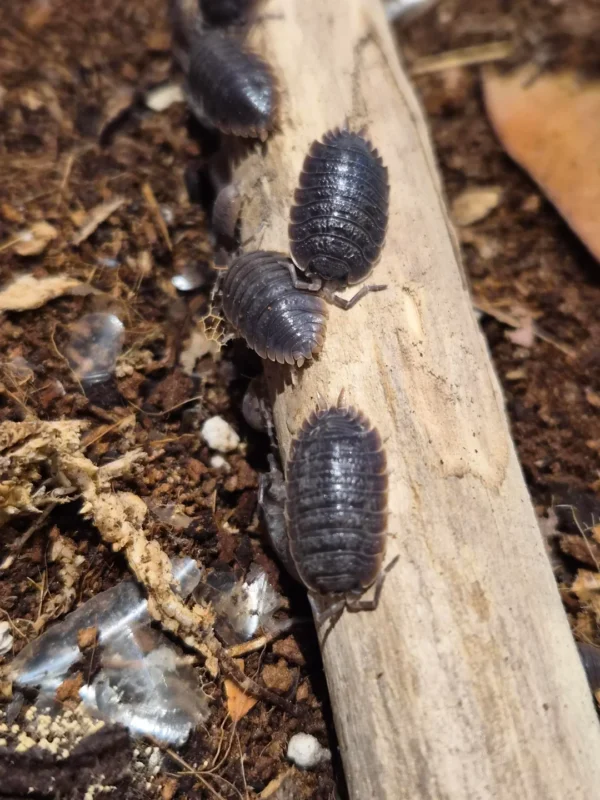

Why they suit beginners:
- They are hardy and productive.
- Their size makes them easy to see and easy to handle gently.
- They suit larger enclosures where smaller isopods can look lost.
- They make a popular feeder isopod for larger pets.
What to know: they are quick, so use a well-fitted lid. They need a moisture gradient, plenty of hides and a steady supply of leaf litter and rotting wood. If you keep several morphs, keep them in separate containers to preserve pure lines.
Best for: bigger bioactive enclosures, feeder colonies and anyone who likes large, active isopods.
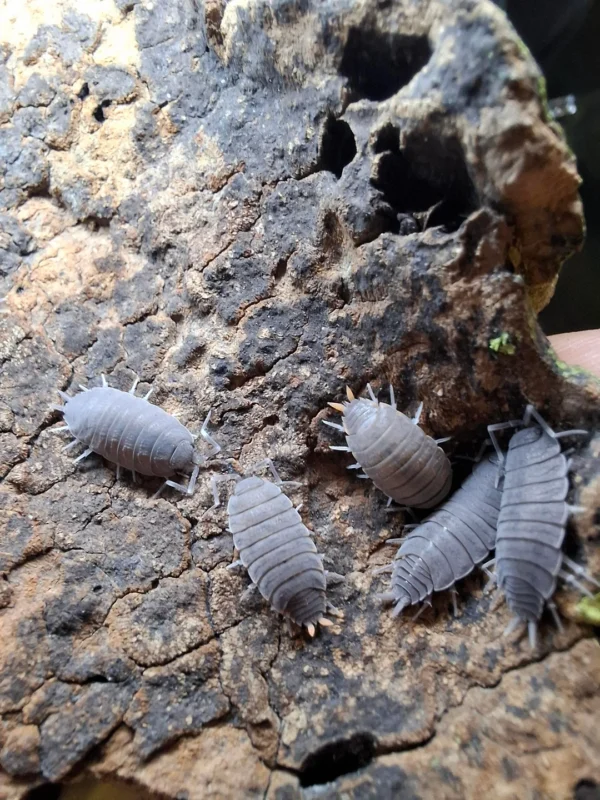
4. Powder isopods (Porcellionides pruinosus)
Powder isopods are small, quick and famously prolific. The classic Powder Blue is a staple of bioactive setups, and the family also includes Powder Orange, Powder White and morphs with names like Oreo Crumble and Orange Cream. They are the best choice for a warm, humid enclosure, and they can handle more moisture than many other species.
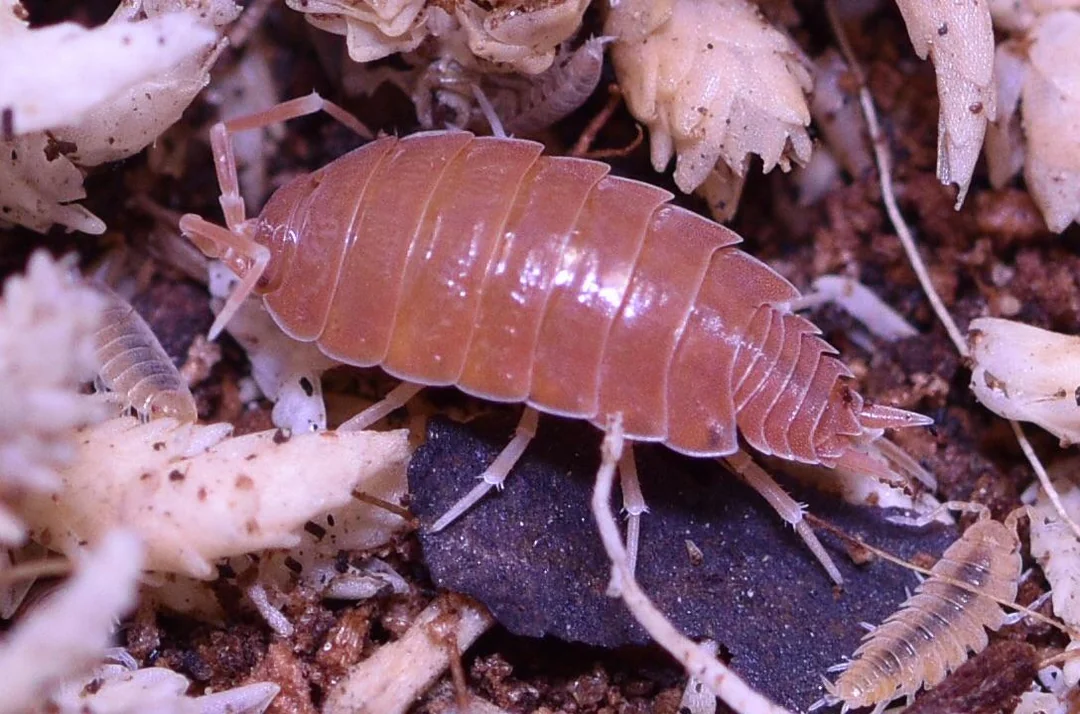
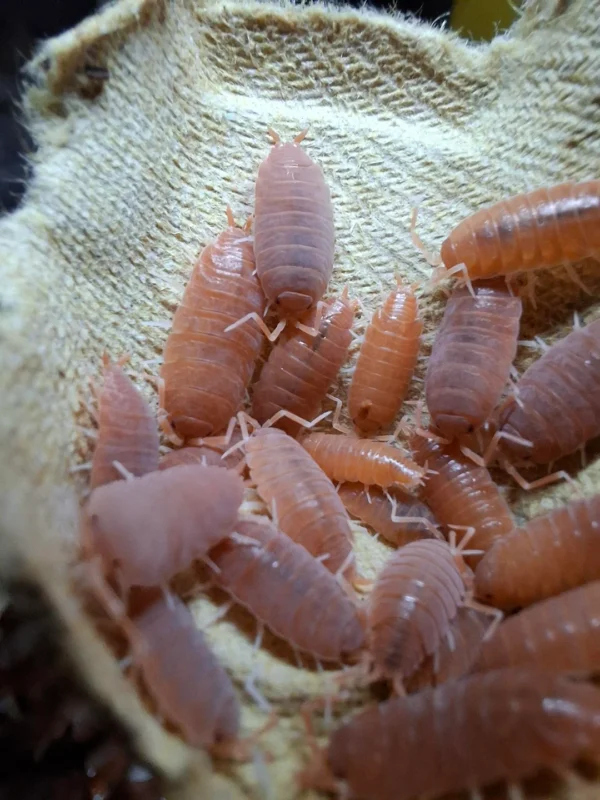
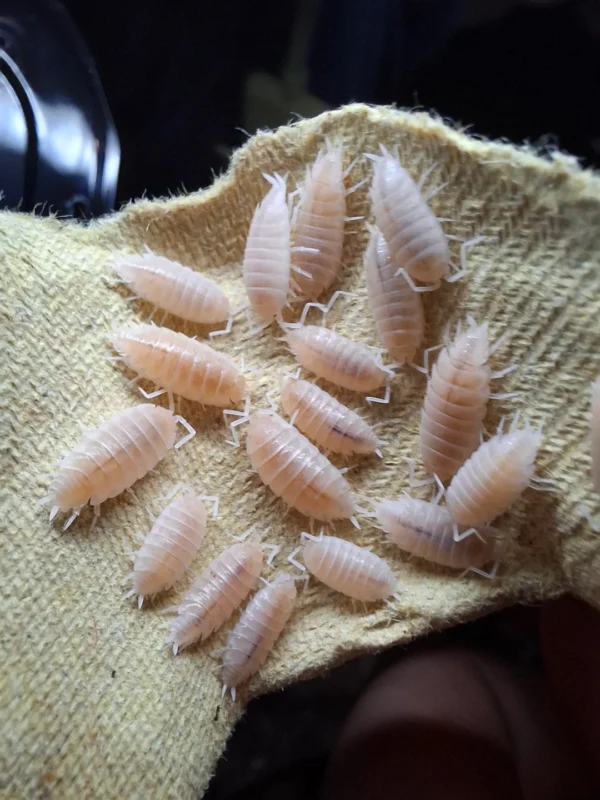
Why they suit beginners:
- They breed fast, so a small group becomes a large colony.
- They tolerate damp conditions better than most.
- They are small enough for almost any enclosure, from compact terrariums to large vivariums.
- They are inexpensive, and the colors are fun to collect.
What to know: because they thrive in warmth and moisture, they are best in tropical setups. Their small size and speed mean they are often seen scurrying across substrate. They cannot roll into a ball. Even though they tolerate moisture, avoid standing water and stagnant, soggy substrate.
Best for: humid tropical vivariums, dart frog enclosures, crested gecko setups and breeders who want a quick-growing colony.
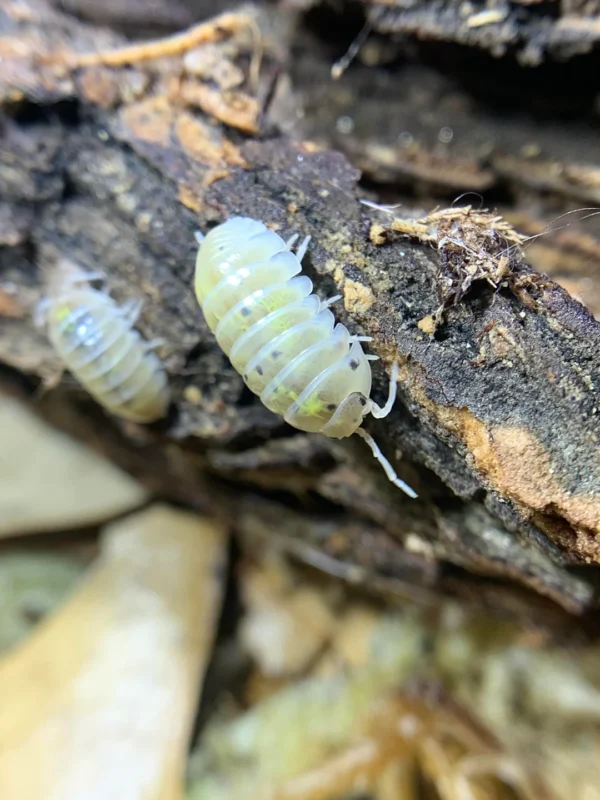
5. Magic Potion isopods (Armadillidium vulgare)
Magic Potion is a designer morph of the common pill bug. Armadillidium vulgare is one of the most widely kept pill bugs, and that heritage means the morph is hardy while looking special. Pill bugs can roll into a tight ball when disturbed, which many people find charming.


Why they suit beginners:
- They are built on a tough, forgiving species.
- The ball-rolling behavior is fun to watch and makes them easy to handle gently.
- They prefer a slightly drier setup, which suits keepers who tend to overwater.
What to know: pill bugs generally prefer drier conditions than Porcellio, so keep one side lightly damp and the other dry, and make sure the enclosure has good airflow. They breed at a steadier pace than powder isopods. There are different lines of Magic Potion, so check your listing for details.
Best for: keepers who like pill bugs, drier or arid bioactive setups, and collectors who want a designer morph that is still easy.
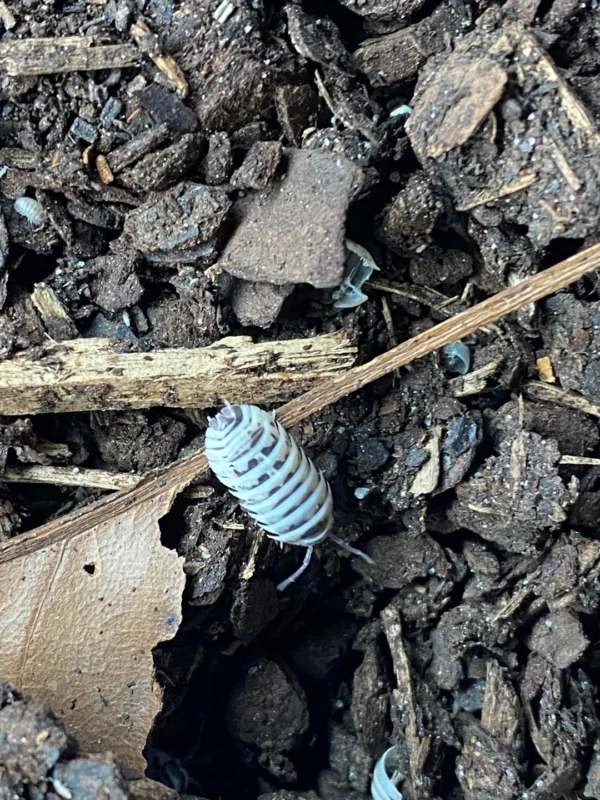
6. Zebra isopods (Armadillidium maculatum)
Zebras are among the most eye-catching pill bugs, with bold black-and-white stripes. Morphs include Standard, Yellow, Chocolate, High White and Champagne. They are a step up from the very easiest species, but still a reasonable first pill bug if you follow the care notes.


Why they suit beginners (with care):
- They are hardy once settled.
- They roll into a perfect ball and look stunning against dark soil.
- Their pattern makes them a great display species.
What to know: like other Armadillidium, Zebras prefer a drier setup with good ventilation. Calcium is important. They breed more slowly than Porcellio, so patience helps. See our isopod collection for current availability.
Best for: keepers who have succeeded with an easier species and want a showpiece pill bug.
Good step-up species
Little Sea (Cubaris murina)
Cubaris are among the most popular “designer” isopods, and Little Sea is the gentlest introduction. It is small, soft grey, hardy for a Cubaris and generally the easiest of the group. It comes in several colors, including Papaya, Florida Orange, Glacier, Anemone and Mamey, all with the same care.

Why it is a good step-up: it teaches you the warm, humid, well-ventilated care that tropical species need, without being as demanding as rarer Cubaris. It rolls into a ball, breeds at a reasonable pace and looks great.
What to know: Cubaris are tropical, so they like warmth and humidity with good airflow, and they punish waterlogged or stagnant substrate. Keep a moisture gradient and avoid cold. They are a good second species once your first colony is thriving.
Orange and other Porcellio morphs
If you have kept Dalmatians successfully, Orange, Calico, Lava and Whiteout all use the same care. They are a low-risk way to expand into colors.
Species to wait on
These are wonderful animals, but we suggest waiting until you have kept a colony alive for several months.
- Ardentiella (Ember Bee, Red Diablo, Tricolor, Scarlet, Pink Lambo and others): tropical, arboreal and more demanding. They need careful humidity, specific foods and stable conditions. We cover them in more detail in our isopod collection pages.
- Montenegro clown isopods (Armadillidium klugii): they come from a cooler, drier region and dislike heat and excess moisture, which catches beginners out.
- Rare Cubaris: several rare lines are slower breeders and less forgiving than Little Sea.
- Porcellio expansus: a larger, sturdy Porcellio that is rewarding but pricier and slower to build up.
There is no shame in starting with an easy species. Many experienced keepers keep a hardy “workhorse” colony alongside their rare animals.
Choosing by goal and by pet
Choosing by your goal
| Your goal | Good choices | Why |
|---|---|---|
| First colony to learn on | Dairy Cow, Dalmatian | Hardy and forgiving |
| Bioactive clean-up crew | Dairy Cow, Giant Canyon, powder isopods | Productive and fast at processing waste |
| Feeder colony | Dairy Cow, Giant Canyon, powder isopods | Fast breeding and good size |
| Display and pattern | Zebra, Magic Potion, Dalmatian morphs | Striking looks |
| Humid tropical setup | Powder isopods, Little Sea | Thrive in warmth and moisture |
| Drier setup | Magic Potion, Zebra | Pill bugs tolerate drier conditions |
| Collecting morphs | Dalmatian line, Cubaris murina | Many colors, same care |
Choosing by the animal you keep
Isopods work well with many pets, but the enclosure’s climate matters most. Match the isopod to the conditions you already provide.
- Crested geckos and other humid, tropical enclosures: powder isopods and Dairy Cow suit the moisture and warmth. Pair them with springtails for a complete crew, as we explain in Springtails vs Isopods.
- Dart frogs: humid setups suit powder isopods and smaller Porcellio. Keep in mind that large, fast species can disturb tiny froglets, so size matters.
- Leopard geckos and other arid setups: choose pill bugs such as Magic Potion or Zebra, which tolerate drier conditions, and give them a damp hide to retreat to.
- Tarantulas and other arachnids: match the enclosure’s humidity, and offer plenty of cover. Do your own research on your tarantula species, since some will eat isopods.
- Snakes and larger reptiles: Giant Canyon and Dairy Cow suit larger enclosures where their size is an advantage.
For a fuller walkthrough, see our guide to setting up a bioactive terrarium.
How to set up your first isopod colony
You do not need much. A simple, well-ventilated tub is enough to keep a healthy colony and learn how isopods behave. Here is the step-by-step setup.
Step 1: Choose a container
A plastic tub of about 6 to 10 quarts (roughly 6 to 10 liters) suits a starter group of ten to fifty. Use an opaque or translucent tub with a snug lid. Larger tubs hold humidity more steadily, which is easier for beginners. Make sure you can fit ventilation holes or mesh.
Step 2: Add ventilation
Good airflow keeps the air fresh and stops mold and stagnant, soggy substrate. Cut or drill ventilation holes in the lid and the upper sides, then cover them with fine mesh so nothing can escape. Pill bugs and Cubaris benefit from extra airflow, while powder isopods prefer slightly more humidity. If your tub is staying soaking wet, add more ventilation.
Step 3: Build the substrate
Fill the tub with two to three inches (5 to 8 cm) of a chemical-free mix. Good options include organic topsoil or coco coir blended with sphagnum moss, topped with leaf litter. Avoid soils with added fertilizers, pesticides or slow-release pellets. Dampen the substrate so it holds together when squeezed but does not drip.
Step 4: Add leaf litter and wood
Cover the surface with a generous layer of dried leaves, such as oak or other untreated hardwood leaves. Add pieces of rotting hardwood or soft decaying wood. This is both food and shelter, and a colony with plenty of it is much healthier.
Step 5: Provide hides
Isopods are shy and stressed by open space. Add cork bark flats, curved bark and hollow pieces so they can tuck in. More hides mean less stress and more breeding. Keep them spread across both the damp and dry sides.
Step 6: Create a moisture gradient
This is the single most important idea in isopod keeping. Lightly mist one side of the tub so it stays damp, and leave the other side drier. Your isopods will move to wherever they are comfortable. Never soak the whole tub, and never let it dry out completely. A good test: squeeze a handful of substrate from the damp side. It should clump but not drip.
Step 7: Add a calcium source
Isopods need calcium to build and harden their exoskeletons. Place a piece of cuttlebone, crushed and baked eggshell or a limestone chunk on the surface. They will graze on it as they need it.
Step 8: Add the isopods
Open your container gently and tip or place the isopods on the surface or near a hide. Do not pour them in a pile. They will find shelter on their own. Keep the lid on and give them a day or two without disturbance.
Step 9: Choose a location
Keep the tub at stable room temperature, out of direct sun and away from drafts, radiators and cold windows. Temperature swings stress isopods more than steady, slightly imperfect conditions.
What to feed isopods
Isopods are detritivores, which means they feed mainly on decaying plant matter. A good diet is simple.
- The staple: dried leaf litter and rotting wood, kept available at all times.
- Vegetables: small pieces of zucchini, carrot, sweet potato or cucumber once or twice a week. Remove leftovers within a day or two, before they mold.
- Protein: a small pinch of fish flakes, dried shrimp or other protein about once a week. Isopods that get enough protein breed better.
- Calcium: cuttlebone or eggshell, always available.
Overfeeding is more dangerous than underfeeding. Rotting food attracts mold and pests, and can foul your substrate. Start small, and add more only if food disappears quickly. If you also keep springtails, our springtail culture care guide explains their feeding, which differs.
Moisture and temperature
Moisture
Isopods breathe through gill-like structures and need a damp environment, but they will drown or sicken in standing water. Aim for a gradient: one damp zone, one drier zone. Mist rather than pour. In very dry homes you may need to mist more often and use a larger tub. In very damp homes you may need more ventilation.
Temperature
Most beginner species are happy at normal room temperatures. Powder isopods and Cubaris prefer warmer conditions, while pill bugs such as Montenegro dislike heat. If your home is cold in winter, a small heat mat on the side of the tub, never underneath the whole container, can help for tropical species. Avoid direct heat sources that can bake the substrate.
Light
Isopods avoid bright light. You do not need special lighting. Keep the tub in a room with natural, indirect light and a normal day and night cycle.
Your first week
- Day 0: open your package immediately. Let the animals sit at room temperature for 2 to 4 hours. Isopods often curl up or stay still after shipping, so give them time before judging. If it is cold, read our guide to winter shipping for live isopods.
- Day 0 to 1: place them in the prepared tub, near a hide, and leave them alone.
- Day 2 to 3: check that the gradient is right, and offer a tiny amount of food.
- Day 4 to 7: remove uneaten fresh food, mist the damp side if it has dried, and watch for movement at dusk or after dim light.
- After one week: keep the routine simple: mist, feed lightly, check, and leave them mostly undisturbed.
If something looks wrong on arrival, contact us within 24 hours with your order number and a photo or video. Our live arrival guarantee covers isopods.
Common beginner mistakes
- Keeping everything too wet. The most common error. Soggy, stagnant substrate causes mold, mites and dead isopods. Use a gradient, not a swamp.
- Letting everything dry out. Isopods desiccate quickly. Never let the whole tub go dry.
- No ventilation. Airless tubs get stale, moldy and sour. Add mesh-covered holes.
- Skipping calcium. Without it, molting problems and weak shells follow.
- Overfeeding. Uneaten food rots. Feed small amounts and remove leftovers.
- Too few hides. Stressed isopods breed poorly. Add more cover.
- Cold or unstable temperatures. Tropical species suffer in the cold. Keep conditions steady.
- Mixing related morphs by accident. Morphs of the same species can interbreed, and offspring may lose the look you wanted.
- Disturbing the colony constantly. Isopods settle best when left alone. Check, don’t dig.
- Buying a species that does not match your setup. A humid-loving isopod in a dry enclosure will struggle. Match species to conditions.
Troubleshooting
My isopods are dying
The usual causes are substrate that is too dry or too wet, no calcium, cold temperatures or stagnant air. Check each in turn. Squeeze the substrate, feel the air, and look for sour smells. Make one change at a time.
My isopods are not breeding
Breeding slows when the colony is too cold, too dry, short on protein or calcium, or too crowded. Make sure the gradient is right, add a bit more protein, and give it time. Many species take weeks to months to show clear growth.
I see tiny white or brown mites
Mites are usually a sign of excess moisture and uneaten food. Remove food scraps, let the surface dry a little, and increase ventilation. A healthy clean-up crew, including springtails, keeps mites and mold in check. Our guides on terrarium mold and fungus gnats explain why.
My isopods keep escaping
Fast climbers such as Dalmatians and Dairy Cows can slip through small gaps. Use a well-fitted lid and mesh over every ventilation hole. Leave a little gap between the substrate and the lid so they are not walking out as you open it.
There is mold
Some mold is normal in a damp enclosure, and isopods eat it. A lot of mold means too much moisture, too much food or too little ventilation. Remove the source and improve airflow.
My isopods are pale or look sick
Isopods turn pale or ghostly before and after molting, which is normal. Persistent unhealthy colors, swelling or lethargy can mean disease. Isolate affected animals and review conditions.
How many to buy and mixing species
How many isopods should I start with?
A group of ten is a good start for a single tub. For a bioactive enclosure, more animals clean up faster, but you can also let a small group grow. Our packs start at ten, and larger quantities cost less per isopod. For a sense of scale, read how we think about quantities in How Many Springtails Do I Need?, which uses the same logic.
Can I keep different isopod species together?
Different species can share an enclosure if they have similar needs and you do not mind them competing. Different species rarely interbreed, but different morphs of the same species do. If you want to keep pure lines, give each morph its own container. If you plan to breed and sell, keep careful labels.
Should I add springtails?
Yes. Springtails and isopods do different jobs. Springtails graze on mold and microscopic waste, and isopods process larger debris. Together they keep a bioactive setup healthier. See Tropical White springtails for a popular partner, or compare temperate and tropical springtails.
A beginner shopping list
Before your isopods arrive, gather the basics. Having everything ready is the easiest way to avoid a stressful first week. Most of this costs very little.
- A tub or enclosure: a ventilated plastic tub of about 6 to 10 quarts, or a larger terrarium if the isopods are joining a bioactive setup.
- Mesh and a drill or heated tool: for ventilation holes you can cover with fine mesh so nothing escapes.
- Substrate: chemical-free organic topsoil or coco coir, plus sphagnum moss if you like to hold more moisture.
- Leaf litter: dried, untreated hardwood leaves, in generous amounts.
- Rotting or soft wood: a few pieces for food and shelter.
- Hides: cork bark flats and curved bark.
- Calcium: cuttlebone, baked eggshell or a limestone piece.
- A spray bottle: for misting the damp side.
- A small thermometer and hygrometer: so you are guessing less. A cheap digital one is enough.
- Food: fish flakes or dried shrimp for protein, and a vegetable such as zucchini or carrot.
- Labels: a marker and tape or labels, so you always know which species or morph is in each container.
If you are building a full bioactive enclosure rather than a simple tub, add live plants, a drainage layer and springtails. Our guide to setting up a bioactive terrarium walks through each layer.
What to expect in your first three months
New keepers often worry because nothing seems to happen at first. Here is a realistic timeline. Every colony is different, and temperature, food and species all change the pace, so treat these as rough guides, not promises.
Week 1: settling in
Your isopods will hide, explore and find the damp and dry zones. You may see few of them during the day. That is normal. Leave them alone, keep the moisture right and feed lightly.
Weeks 2 to 4: routine
You should start to see isopods feeding and moving around at dusk or in low light. Some will molt, which means they split their old skin in two halves and eat it. Pale, ghostly animals are usually just molting. Keep calcium available during this stage.
Month 2: first signs of breeding
Females carry eggs in a pouch on their underside, which looks like a pale, bulging marsupium. You may soon notice tiny pale babies in the leaf litter. Do not panic if you see only a few. They are small, shy and easy to miss.
Month 3: growing colony
With stable conditions, many easy species show clear growth by now. You will see a range of sizes, which is the best sign of a healthy colony. If you see no babies at all by month three, review moisture, calcium, protein and temperature using the troubleshooting section.
A simple weekly and monthly routine
A colony does best on a steady, low-effort routine. This one takes about ten minutes a week.
Every few days
- Glance at the moisture gradient. Mist the damp side if it has dried.
- Look for uneaten fresh food and remove it.
Once a week
- Offer a small portion of vegetable and a pinch of protein.
- Check that calcium is still available.
- Count roughly how many isopods you can see at dusk, to spot changes over time.
Once a month
- Top up the leaf litter, since it gets eaten and broken down.
- Replace chewed-down pieces of wood.
- Check the bottom layer of substrate for sour smells or heavy compaction, and loosen it gently if needed.
Every few months
- Refresh part of the substrate if it looks exhausted, leaving the old layer in place so the colony is not disturbed all at once.
- Thin the colony if it is overcrowded, by moving some isopods to a new tub. Overcrowding slows breeding.
Quick picks: which one should I buy first?
Still undecided? Match your situation to a starter.
- “I have never kept isopods and want the simplest start.” Dairy Cow or Dalmatian.
- “I have a warm, humid tropical enclosure.” Powder isopods, with Dairy Cow as a second option.
- “My enclosure is on the dry side.” Magic Potion or Zebra pill bugs, with a damp hide for balance.
- “I want something big and impressive.” Giant Canyon.
- “I want color without much difficulty.” Orange, Calico, Lava or Whiteout morphs of Dalmatian, or the Cubaris murina range once you feel confident.
- “I want a gift for someone new to the hobby.” A bundle that pairs springtails and isopods is the easiest present, because it gives the recipient a complete crew in one box. See our gift sets.
- “I want to move up to rare species.” Start with Little Sea, then look at the rarer Cubaris and Ardentiella once you are comfortable.
If you keep rare springtails as well, remember that some collector springtails need a specific food. Our guide to feeding McDo and Santa Claus springtails with slime mold explains how.
Buying tips
- Buy from a seller who answers questions. You should be able to ask about species, sourcing and shipping.
- Check how each line was obtained. Listings should be honest about sourcing. If a seller will not say, ask.
- Check the shipping rules. Look for weather holds, heat packs in winter and a clear live arrival guarantee. Ours are in the Shipping Policy.
- Order early in the week. We ship Monday to Wednesday so packages do not sit in transit over a weekend.
- Consider a starter bundle. Our gift sets combine springtails and isopods, and make a good first purchase for yourself as well as a gift.
- Keep expectations realistic. A colony takes weeks to months to build. Patience pays off.
Ready to browse? Start with our isopods or ask us anything on the contact page.
Frequently asked questions
What is the easiest isopod to keep?
Dairy Cow, Dalmatian and Giant Canyon isopods are among the easiest, along with powder isopods in warm, humid setups. They are hardy, breed reliably and tolerate beginner mistakes.
What is the best isopod for a bioactive terrarium?
It depends on the enclosure’s humidity. Powder isopods and Dairy Cow suit humid tropical setups, while pill bugs such as Magic Potion and Zebra suit drier ones. Pair them with springtails for a complete crew.
Are isopods hard to take care of?
Not if you start with a hardy species. They need a moisture gradient, hides, leaf litter, calcium and a stable temperature. Most problems come from keeping the enclosure too wet or too dry.
How often do you feed isopods?
Leave leaf litter and rotting wood available all the time, offer vegetables once or twice a week, and add a small amount of protein about once a week. Remove uneaten fresh food within a day or two.
Do isopods need water?
They need humidity and a damp area, not standing water. Mist one side of the enclosure and let the other dry out a little.
Do isopods need light or heat?
They do not need special lighting. Most beginner species are comfortable at normal room temperatures, but tropical species like powders and Cubaris prefer it warmer.
How fast do isopods reproduce?
It depends on the species and conditions. Powder and Porcellio isopods breed quickly, while pill bugs and rarer species are slower. Expect weeks to months for a visible increase.
Can I handle isopods?
Yes, gently. Pill bugs roll into a ball and are easy to hold. Faster species such as Dairy Cows are more skittish. Wash your hands afterward.
Can I keep different morphs together?
You can, but morphs of the same species can interbreed and blend their looks. Keep them separate if you want pure lines.
Can I release isopods outdoors?
No. Many hobby species are not native to the United States and may be restricted where you live. Keep them in an enclosure and never release them.
Do isopods eat live plants?
Mostly they eat decaying material, but a hungry, underfed colony may nibble soft or damaged plants. Keep them well fed with leaf litter and wood and they usually leave healthy plants alone.
Where can I buy isopods?
You can buy live isopods from us. Browse the full range of isopods for sale, with a live arrival guarantee on every order.
The bottom line
For most beginners, start with Dairy Cow or Dalmatian isopods, add powder isopods if your enclosure is warm and humid, and choose Magic Potion or Zebra if you like pill bugs or keep a drier setup. Give them a moisture gradient, hides, leaf litter, calcium and patience, and you will have a healthy colony. When you are ready for a challenge, move on to Cubaris and the rarer collector species.
Questions? Check our FAQ, read How It Works, or get in touch. If you are thinking of giving isopods as a gift, see our guide to the best gifts for bioactive and terrarium lovers. If you keep rare springtails too, our guide to slime mold for springtails covers McDo and Santa Claus feeding.
Table of Contents
